How to change the Kubernetes cluster service DNS IP address

Source: cajieh.com
Introduction
The Kubernetes cluster service DNS IP address is the IP address used by the cluster DNS service, such as kube-dns or CoreDNS, to resolve the names of services and pods in a cluster. Typically, this IP address is defined in the cluster configuration and can be found in the kube-apiserver.yaml and kubelet/config.yaml files. Additionally, you can view the DNS IP address by checking the kube-dns or CoreDNS service in the kube-system namespace. Some of the functions of the DNS IP address include service discovery, name resolution, load balancing, and simplified configuration.
Let’s get started by following below.
Pre-requisite:
- Basic knowledge of Container technology and kubernetes are required
- Proficient in the use of command line tools i.e. Bash terminal
- Access to a Kubernetes cluster if you want to experiment with the example in this tutorial
Veiw the current cluster service DNS IP Address
To start, login to a Kubernetes cluster and verify the current cluster service DNS IP address by executing the following command:
kubectl get services -n kube-system

NAME       TYPE        CLUSTER-IP   EXTERNAL-IP   PORT(S)                  AGE
kube-dns   ClusterIP   10.96.0.10   <none>        53/UDP,53/TCP,9153/TCP   30d
From the output above, we can see that the DNS IP address is 10.96.0.10, which is the IP address used by the cluster’s DNS service to resolve the names of services and pods in the cluster. Additionally, we can check the DNS IP address by creating a pod and viewing the nameserver address in the "/etc/resolv.conf" file.
// Create an nginx pod
k run pod1 --image=nginx

// Exec into the pod
k exec pod1 -it -- sh

// View the DNS IP address
# cat /etc/resolv.conf
search default.svc.cluster.local svc.cluster.local cluster.local
nameserver 10.96.0.10
options ndots:5
Again the DNS IP Address is the same as viewed earlier using kubectl get services -n kube-system
Steps by steps instructions for changing the DNS IP Address
For demonstration purpose, let’s change the DNS IP Address from 10.96.0.10 to 50. 96.0.0 performing the following steps in the control plane node:
Step 1:
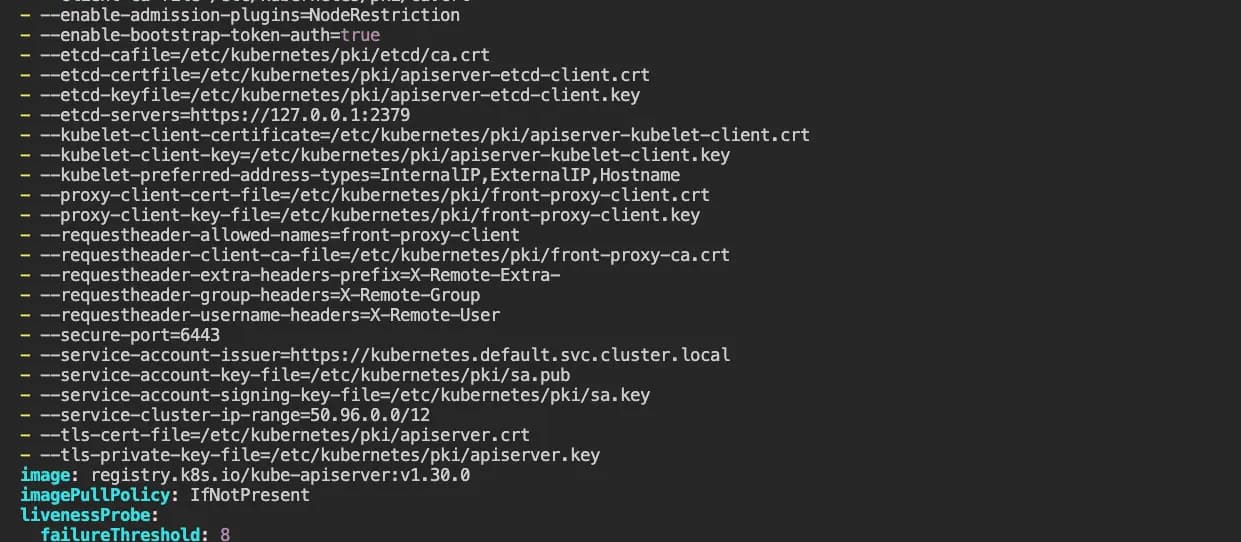
Change the CIDR IP address range in the “kube-apiserver.yaml” file located in “/etc/kubernetes/manifests” directory. Open the “/etc/kubernetes/manifests/kube-apiserver.yaml” file and locate the “- --service-cluster-ip-range=10.96.0.0/12” . Change “10.96.0.0/12” to “50.96.0.0/12”. Save and exit the file.
Step 2:
Change the DNS IP address in the kube-dns service using k -n kube-system edit svc kube-dns command. See below:
kube-system edit svc kube-dns

// Caveat: You may get the following error.
The connection to the server 172.30.1.2:6443 was refused - did you specify the right host or port?
Just wait a few minutes for the cluster to recognize the kube-apiserver change made in the previous step. If you try again after a few minutes, you should be able to find the clusterIP under the spec: property.
k -n kube-system edit svc kube-dns

spec:
  clusterIP: 10.96.0.10
  clusterIPs:
  - 10.96.0.10
Change the clusterIP in both places to 50.96.0.10. Should look like the below:
spec:
  clusterIP: 10.96.0.10
  clusterIPs:
  - 10.96.0.10
You would likely see the following error after saving the change:
error: services "kube-dns" is invalid
A copy of your changes has been stored to "/tmp/kubectl-edit-3110996634.yaml"
error: Edit cancelled, no valid changes were saved.
Use replace and --force commands to apply the chnage. See below:
k replace -f /tmp/kubectl-edit-3110996634.yaml --force
service "kube-dns" deleted
Service “kube-dns” created
Step 3:
Change the cluster DNS IP address in the Kubelet “config.yaml” file located in “/var/lib/kubelet/” directory. Open the “/var/lib/kubelet/config.yaml” file and locate the clusterDNS property and change as shown below:
From:
clusterDNS:
- 10.96.0.10
To:
clusterDNS:
- 50.96.0.10
Then, save the change
Step 4:
Change the cluster DNS IP address in the kube-configmap resource using k -n kube-system edit cm kubelet-config. Execute the following command and locate the clusterDNS property to change the DNS IP address in the kubelet-config resource. .See below:
k -n kube-system edit cm kubelet-config
From:
    clusterDNS:
    - 10.96.0.10
To:
    clusterDNS:
    - 50.96.0.10
Step 5:
To complete the change process, execute the following commands to apply the changes to the cluster. This will result in the new DNS IP address being assigned to newly created service and pod resources.
kubeadm upgrade node phase kubelet-config
systemctl daemon-reload
systemctl restart kubelet
To confirm the changes performed above, create another Pod using the nginx image and exec into the pod to verify the DNS nameserver address in the "/etc/resolv.conf" file. The nameserver should have the updated cluster DNS IP address range. See below:
k run pod1 --image=nginx
pod/pod1 created

k exec pod1 -it  -- sh
# cat /etc/resolv.conf
search default.svc.cluster.local svc.cluster.local cluster.local
nameserver 50.96.0.10
options ndots:5
This concludes the tutorial on how to change the Kubernetes cluster service DNS IP address by making changes in the kube-apiserver.yaml, kube-dns service, kubelet/config.yaml, and kubelet configMap resource. Then, followed by executing the kubeadm upgrade node phase kubelet-config, systemctl daemon-reload, and systemctl restart kubelet commands for the newly created service and pod resources to pick up the change.
I hope this helps! Go to the contact page and let me know if you have any further questions.